10. Appendices
10.1. Required Perl modules
If you intend to use latexindent.pl and not one of the supplied standalone executable files (latexindent.exe is available for Windows users without Perl, see Section 1.3.2), then you will need a few standard Perl modules.
If you can run the minimum code in Listing 642 as in
perl helloworld.pl
then you will be able to run latexindent.pl, otherwise you may need to install the missing modules; see Section 10.1.1 and Section 10.1.2.
#!/usr/bin/perl

use strict;                         #     |
use warnings;                       #     |
use Encode;                         #     |
use Getopt::Long;                   #     |
use Data::Dumper;                   #  these modules are
use List::Util qw(max);             #  generally part
use PerlIO::encoding;               #  of a default perl distribution
use open ':std', ':encoding(UTF-8)';#     |
use Text::Wrap;                     #     |
use Text::Tabs;                     #     |
use FindBin;                        #     |
use File::Copy;                     #     |
use File::Basename;                 #     |
use File::Path;                     #     |
use File::HomeDir;                  # <--- typically requires install via cpanm
use YAML::Tiny;                     # <--- typically requires install via cpanm

print "hello world";
exit;
10.1.1. Module installer script
latexindent.pl ships with a helper script that will install any missing perl modules on your system; if you run
perl latexindent-module-installer.pl
or
perl latexindent-module-installer.pl
then, once you have answered Y, the appropriate modules will be installed onto your distribution.
10.1.2. Manually installing modules
Manually installing the modules given in Listing 642 will vary depending on your operating system and Perl distribution.
10.1.3. Linux
10.1.3.1. perlbrew
Linux users may be interested in exploring Perlbrew (“Perlbrew” n.d.); an example installation would be:
sudo apt-get install perlbrew
perlbrew init
perlbrew install perl-5.42.0
perlbrew switch perl-5.42.0
sudo apt-get install curl
curl -L http://cpanmin.us | perl - App::cpanminus
cpanm YAML::Tiny
cpanm File::HomeDir
10.1.3.2. Ubuntu/Debian
For other distributions, the Ubuntu/Debian approach may work as follows
sudo apt install perl
sudo cpan -i App::cpanminus
sudo cpanm YAML::Tiny
sudo cpanm File::HomeDir
or else by running, for example,
sudo perl -MCPAN -e'install "File::HomeDir"'
10.1.3.3. Ubuntu: using the texlive from apt-get
Ubuntu users that install texlive using apt-get as in the following
sudo apt install texlive
sudo apt install texlive-latex-recommended
may need the following additional command to work with latexindent.pl
sudo apt install texlive-extra-utils
10.1.3.4. Ubuntu: users without perl
latexindent-linux is a standalone executable for Ubuntu Linux (and therefore does not require a Perl distribution) and caches copies of the Perl modules onto your system. It is available from (“Home of Latexindent.pl” n.d.).
10.1.3.5. Arch-based distributions
latexindent is included in Arch-packaged TeX Live, and can be installed by:
sudo pacman -S texlive-binextra perl-yaml-tiny perl-file-homedir
To enable optional –GCString switch, install perl-unicode-linebreak:
sudo pacman -S perl-unicode-linebreak
10.1.3.6. Alpine
If you are using Alpine, some Perl modules are not build-compatible with Alpine, but replacements are available through apk. For example, you might use the commands given in Listing 643; thanks to (J. 2020) for providing these details.
# Installing perl
apk --no-cache add miniperl perl-utils

# Installing incompatible latexindent perl dependencies via apk
apk --no-cache add \
    perl-log-dispatch \
    perl-namespace-autoclean \
    perl-specio \
    perl-unicode-linebreak

# Installing remaining latexindent perl dependencies via cpan
apk --no-cache add curl wget make
ls /usr/share/texmf-dist/scripts/latexindent
cd /usr/local/bin && \
    curl -L https://cpanmin.us/ -o cpanm && \
    chmod +x cpanm
cpanm -n App::cpanminus
cpanm -n File::HomeDir
cpanm -n Params::ValidationCompiler
cpanm -n YAML::Tiny
Users of NixOS might like to see https://github.com/cmhughes/latexindent.pl/issues/222 for tips.
10.1.4. Mac
Users of the Macintosh operating system might like to explore the following commands, for example:
brew install perl
brew install cpanm

cpanm YAML::Tiny
cpanm File::HomeDir
Alternatively,
brew install latexindent
latexindent-macos is a standalone executable for macOS (and therefore does not require a Perl distribution) and caches copies of the Perl modules onto your system. It is available from (“Home of Latexindent.pl” n.d.).
10.1.5. Windows
Strawberry Perl users on Windows might use CPAN client. All of the modules are readily available on CPAN (“CPAN: Comprehensive Perl Archive Network” n.d.). indent.log will contain details of the location of the Perl modules on your system.
latexindent.exe is a standalone executable for Windows (and therefore does not require a Perl distribution) and caches copies of the Perl modules onto your system; if you wish to see where they are cached, use the trace option, e.g
latexindent.exe -t myfile.tex
10.1.6. The GCString switch
If you find that the lookForAlignDelims (as in Section 3.5) does not work correctly for your language, then you may wish to use the Unicode::GCString module .
This can be loaded by calling latexindent.pl with the GCString switch as in
latexindent.pl --GCString myfile.tex
In this case, you will need to have the Unicode::GCString installed in your perl distribution by using, for example,
cpanm Unicode::GCString
Note: this switch does nothing for latexindent.exe which loads the module by default. Users of latexindent.exe should not see any difference in behaviour whether they use this switch or not, as latexindent.exe loads the Unicode::GCString module.
10.2. Updating the path variable
latexindent.pl has a few scripts (available at (“Home of Latexindent.pl” n.d.)) that can update the path variables. Thank you to (Juang 2015) for this feature. If you’re on a Linux or Mac machine, then you’ll want CMakeLists.txt from (“Home of Latexindent.pl” n.d.).
10.2.1. Add to path for Linux
To add latexindent.pl to the path for Linux, follow these steps:
download
latexindent.pland its associated modules,defaultSettings.yaml, to your chosen directory from (“Home of Latexindent.pl” n.d.) ;within your directory, create a directory called
path-helper-filesand downloadCMakeLists.txtandcmake_uninstall.cmake.infrom (“Home of Latexindent.pl” n.d.)/path-helper-files to this directory;run
ls /usr/local/bin
to see what is currently in there;
run the following commands
sudo apt-get update
sudo apt-get install --no-install-recommends cmake make # or any other generator
mkdir build && cd build
cmake ../path-helper-files
sudo make install
run
ls /usr/local/bin
again to check that
latexindent.pl, its modules anddefaultSettings.yamlhave been added.
To remove the files, run
sudo make uninstall
10.2.2. Add to path for Windows
To add latexindent.exe to the path for Windows, follow these steps:
download
latexindent.exe,defaultSettings.yaml,add-to-path.batfrom (“Home of Latexindent.pl” n.d.) to your chosen directory;open a command prompt and run the following command to see what is currently in your
%path%variable;echo %path%right click on
add-to-path.batand Run as administrator;log out, and log back in;
open a command prompt and run
echo %path%to check that the appropriate directory has been added to your
%path%.
To remove the directory from your %path%, run remove-from-path.bat as administrator.
10.3. Batches of files
You can instruct latexindent.pl to operate on multiple files. For example, the following calls are all valid
latexindent.pl myfile1.tex
latexindent.pl myfile1.tex myfile2.tex
latexindent.pl myfile*.tex
We note the following features of the script in relation to the switches detailed in Section 2.
10.3.1. location of indent.log
If the -c switch is not active, then indent.log goes to the directory of the final file called.
If the -c switch is active, then indent.log goes to the specified directory.
10.3.2. interaction with -w switch
If the -w switch is active, as in
latexindent.pl -w myfile*.tex
then files will be overwritten individually. Back-up files can be re-directed via the -c switch.
10.3.3. interaction with -o switch
If latexindent.pl is called using the -o switch as in
latexindent.pl myfile*.tex -o=my-output-file.tex
and there are multiple files to operate upon, then the -o switch is ignored because there is only one output file specified.
More generally, if the -o switch does not have a + symbol at the beginning, then the -o switch will be ignored, and is turned it off.
For example
latexindent.pl myfile*.tex -o=+myfile
will work fine because each .tex file will output to <basename>myfile.tex
Similarly,
latexindent.pl myfile*.tex -o=++
will work because the ‘existence check/incrementation’ routine will be applied.
10.3.4. interaction with lines switch
This behaves as expected by attempting to operate on the line numbers specified for each file. See the examples in Section 6.
10.3.5. interaction with check switches
The exit codes for latexindent.pl are given in Table 1.
When operating on multiple files with the check switch active, as in
latexindent.pl myfile*.tex --check
then
exit code 0 means that the text from none of the files has been changed;
exit code 1 means that the text from at least one of the files been file changed.
The interaction with checkv switch is as in the check switch, but with verbose output.
10.3.6. when a file does not exist
What happens if one of the files can not be operated upon?
if at least one of the files does not exist and
latexindent.plhas been called to act upon multiple files, then the exit code is 3; note thatlatexindent.plwill try to operate on each file that it is called upon, and will not exit with a fatal message in this case;if at least one of the files can not be read and
latexindent.plhas been called to act upon multiple files, then the exit code is 4; note thatlatexindent.plwill try to operate on each file that it is called upon, and will not exit with a fatal message in this case;if
latexindent.plhas been told to operate on multiple files, and some do not exist and some cannot be read, then the exit code will be either 3 or 4, depending upon which it scenario it encountered most recently.
10.4. latexindent-yaml-schema.json
latexindent.pl ships with latexindent-yaml-schema.json which might help you when constructing your YAML files.
10.4.1. VSCode demonstration
To use latexindent-yaml-schema.json with VSCode, you can use the following steps:
download
latexindent-yaml-schema.jsonfrom thedocumentationfolder of (“Home of Latexindent.pl” n.d.), save it in whichever directory you would like, noting it for reference;following the instructions from (“How to Create Your Own Auto-Completion for Json and Yaml Files on Vs Code with the Help of Json Schema” n.d.), for example, you should install the VSCode YAML extension (“VSCode Yaml Extension” n.d.);
set up your
settings.jsonfile using the directory you saved the file by adapting Listing 644; on my Ubuntu laptop this file lives at/home/cmhughes/.config/Code/User/settings.json.
{
  "yaml.schemas": {
    "/home/cmhughes/projects/latexindent/documentation/latexindent-yaml-schema.json": "/home/cmhughes/projects/latexindent/defaultSettings.yaml"
  },
  "redhat.telemetry.enabled": true
}
Alternatively, if you would prefer not to download the json file, you might be able to use an adapted version of Listing 645.
{
  "yaml.schemas": {
    "https://raw.githubusercontent.com/cmhughes/latexindent.pl/main/documentation/latexindent-yaml-schema.json": "/home/cmhughes/projects/latexindent/defaultSettings.yaml"
  }
}
Finally, if your TeX distribution is up to date, then latexindent-yaml-schema.json should be in the documentation folder of your installation, so an adapted version of Listing 646 may work.
{
  "yaml.schemas": {
    "/usr/local/texlive/2021/texmf-dist/doc/support/latexindent/latexindent-yaml-schema.json": "/home/cmhughes/projects/latexindent/defaultSettings.yaml"
  }
}
If you have details of how to implement this schema in other editors, please feel encouraged to contribute to this documentation.
10.5. Using conda
If you use conda you’ll only need
conda install latexindent.pl -c conda-forge
This will install the executable and all its dependencies (including perl) in the activate environment. You don’t even have to worry about defaultSettings.yaml as it included too, you can thus skip Section 10.1 and Section 10.2.
You can get a conda installation for example from (“Conda Forge” n.d.) or from (“Anacoda” n.d.).
10.5.1. Sample conda installation on Ubuntu
On Ubuntu I followed the 64-bit installation instructions at (“How to Install Anaconda on Ubuntu?” n.d.) and then I ran the following commands:
conda create -n latexindent.pl
conda activate latexindent.pl
conda install latexindent.pl -c conda-forge
conda info --envs
conda list
conda run latexindent.pl -vv
I found the details given at (“Solving Environment: Failed with Initial Frozen Solve. Retrying with Flexible Solve.” n.d.) to be helpful.
10.6. Using docker
If you use docker you’ll only need
docker pull ghcr.io/cmhughes/latexindent.pl
This will download the image packed latexindent’s executable and its all dependencies.
Thank you to (eggplants 2022) for contributing this feature; see also (“Latexindent.pl Ghcr (Github Container Repository) Location” n.d.). For reference, ghcr stands for GitHub Container Repository.
10.6.1. Sample docker installation on Ubuntu
To pull the image and show latexindent’s help on Ubuntu:
# setup docker if not already installed
if ! command -v docker &> /dev/null; then
  sudo apt install docker.io -y
  sudo groupadd docker
  sudo gpasswd -a "$USER" docker
  sudo systemctl restart docker
  newgrp docker
fi

# download image and execute
docker pull ghcr.io/cmhughes/latexindent.pl
docker run ghcr.io/cmhughes/latexindent.pl -h
Once I have run the above, on subsequent logins I run
newgrp docker
docker run ghcr.io/cmhughes/latexindent.pl -h
10.6.2. How to format on Docker
When you use latexindent with the docker image, you have to mount target tex file like this:
docker run -v /path/to/local/myfile.tex:/myfile.tex ghcr.io/cmhughes/latexindent.pl -s -w myfile.tex
10.7. pre-commit
Users of .git may be interested in exploring the pre-commit tool (“Pre-Commit: A Framework for Managing and Maintaining Multi-Language Pre-Commit Hooks.” n.d.), which is supported by latexindent.pl. Thank you to (Geus 2022) for contributing this feature, and to (Holthuis 2022) for their contribution to it.
To use the pre-commit tool, you will need to install pre-commit; sample instructions for Ubuntu are given in Section 10.7.1. Once installed, there are two ways to use pre-commit: using CPAN or using conda, detailed in Section 10.7.3 and Section 10.7.4 respectively.
10.7.1. Sample pre-commit installation on Ubuntu
On Ubuntu I ran the following command:
python3 -m pip install pre-commit
I then updated my path via .bashrc so that it includes the line in Listing 649.
...
export PATH=$PATH:/home/cmhughes/.local/bin
10.7.2. pre-commit defaults
The default values that are employed by pre-commit are shown in Listing 650.
- id: latexindent
  name: latexindent.pl
  description: Run latexindent.pl (get dependencies using CPAN)
  minimum_pre_commit_version: 2.1.0
  entry: latexindent.pl
  args: ["--overwriteIfDifferent", "--silent", "--local"]
  language: perl
  types: [tex]
- id: latexindent-conda
  name: latexindent.pl
  description: Run latexindent.pl (get dependencies using Conda)
  minimum_pre_commit_version: 2.1.0
  entry: latexindent.pl
  args: ["--overwriteIfDifferent", "--silent", "--local"]
  language: conda
  types: [tex]
- id: latexindent-docker
  name: latexindent.pl
  description: Run latexindent.pl (get dependencies using Docker)
  minimum_pre_commit_version: 2.1.0
  entry: ghcr.io/cmhughes/latexindent.pl:4.0.2
  language: docker_image
  types: [tex]
  args: ["--overwriteIfDifferent", "--silent", "--local"]
In particular, the decision has deliberately been made (in collaboration with (Holthuis 2022)) to have the default to employ the following switches: overwriteIfDifferent, silent, local; this is detailed in the lines that specify args in Listing 650.
Warning
Users of pre-commit will, by default, have the overwriteIfDifferent switch employed. It is assumed that such users have version control in place, and are intending to overwrite their files.
10.7.3. pre-commit using CPAN
To use latexindent.pl with pre-commit, create the file .pre-commit-config.yaml given in Listing 651 in your git-repository.
- repo: https://github.com/cmhughes/latexindent.pl
  rev: V4.0.2
  hooks:
  - id: latexindent
    args: [-s]
Once created, you should then be able to run the following command:
pre-commit run --all-files
A few notes about Listing 651:
the settings given in Listing 651 instruct
pre-committo useCPANto get dependencies;this requires
pre-commitandperlto be installed on your system;the
argslists selected command-line options; the settings in Listing 651 are equivalent to callinglatexindent.pl -s myfile.tex
for each
.texfile in your repository;to instruct
latexindent.plto overwrite the files in your repository, then you can update Listing 651 so thatargs: [-s, -w].
Naturally you can add options, or omit -s and -w, according to your preference.
10.7.4. pre-commit using conda
You can also rely on conda (detailed in Section 10.5) instead of CPAN for all dependencies, including latexindent.pl itself.
- repo: https://github.com/cmhughes/latexindent.pl
  rev: V4.0.2
  hooks:
  - id: latexindent-conda
    args: [-s]
Once created, you should then be able to run the following command:
pre-commit run --all-files
A few notes about Listing 651:
the settings given in Listing 652 instruct
pre-committo usecondato get dependencies;this requires
pre-commitandcondato be installed on your system;the
argslists selected command-line options; the settings in Listing 651 are equivalent to callingconda run latexindent.pl -s myfile.tex
for each
.texfile in your repository;to instruct
latexindent.plto overwrite the files in your repository, then you can update Listing 651 so thatargs: [-s, -w].
10.7.5. pre-commit using docker
You can also rely on docker (detailed in Section 10.6) instead of CPAN for all dependencies, including latexindent.pl itself.
- repo: https://github.com/cmhughes/latexindent.pl
  rev: V4.0.2
  hooks:
    - id: latexindent-docker
      args: [-s]
Once created, you should then be able to run the following command:
pre-commit run --all-files
A few notes about Listing 651:
the settings given in Listing 653 instruct
pre-committo usedockerto get dependencies;this requires
pre-commitanddockerto be installed on your system;the
argslists selected command-line options; the settings in Listing 651 are equivalent to callingdocker run -v /path/to/myfile.tex:/myfile.tex ghcr.io/cmhughes/latexindent.pl -s myfile.tex
for each
.texfile in your repository;to instruct
latexindent.plto overwrite the files in your repository, then you can update Listing 651 so thatargs: [-s, -w].
10.7.6. pre-commit example using -l, -m switches
Let’s consider a small example, with local latexindent.pl settings in .latexindent.yaml.
We use the local settings given in Listing 654.
onlyOneBackUp: 1

modifyLineBreaks:
 oneSentencePerLine:
   manipulateSentences: 1
and .pre-commit-config.yaml as in Listing 655:
- repo: https://github.com/cmhughes/latexindent.pl
  rev: V4.0.2
  hooks:
  - id: latexindent
    args: [-l, -m, -s, -w]
Now running
pre-commit run --all-files
is equivalent to running
latexindent.pl -l -m -s -w myfile.tex
for each .tex file in your repository.
A few notes about Listing 655:
the
-loption was added to use the local.latexindent.yaml(where it was specified to only create one back-up file, asgittypically takes care of this when you usepre-commit);-mto modify line breaks; in addition to-sto suppress command-line output, and-wto format files in place.
10.8. indentconfig options
The behaviour of latexindent.pl is controlled from the settings specified in any of the YAML files that you tell it to load. By default, latexindent.pl will only load defaultSettings.yaml, but there are a few ways that you can tell it to load your own settings files.
We focus our discussion on indentconfig.yaml, but there are other options which we also detail here.
10.8.1. indentconfig.yaml and .indentconfig.yaml
latexindent.pl will always check your home directory for indentconfig.yaml and .indentconfig.yaml (unless it is called with the -d switch), which is a plain text file you can create that contains the absolute paths for any settings files that you wish latexindent.pl to load. There is no difference between indentconfig.yaml and .indentconfig.yaml, other than the fact that .indentconfig.yaml is a ‘hidden’ file; thank you to (Diaz 2014) for providing this feature.
In what follows, we will use indentconfig.yaml, but it is understood that this could equally represent .indentconfig.yaml. If you have both files in existence then indentconfig.yaml takes priority.
For Mac and Linux users, their home directory is `` /username`` while Windows (Vista onwards) is C:\Users\username 1 Listing 656 shows a sample indentconfig.yaml file.
# Paths to user settings for latexindent.pl
#
# Note that the settings will be read in the order you
# specify here- each successive settings file will overwrite
# the variables that you specify

paths:
- /home/cmhughes/Documents/yamlfiles/mysettings.yaml
- /home/cmhughes/folder/othersettings.yaml
- /some/other/folder/anynameyouwant.yaml
- C:\Users\chughes\Documents\mysettings.yaml
- C:\Users\chughes\Desktop\test spaces\more spaces.yaml
Note that the .yaml files you specify in indentconfig.yaml will be loaded in the order in which you write them. Each file doesn’t have to have every switch from defaultSettings.yaml; in fact, I recommend that you only keep the switches that you want to change in these settings files.
To get started with your own settings file, you might like to save a copy of defaultSettings.yaml in another directory and call it, for example, mysettings.yaml. Once you have added the path to indentconfig.yaml you can change the switches and add more code-block names to it as you see fit – have a look at Listing 657 for an example that uses four tabs for the default indent, adds the tabbing environment/command to the list of environments that contains alignment
delimiters; you might also like to refer to the many YAML files detailed throughout the rest of this documentation.
# Default value of indentation
defaultIndent: "\t\t\t\t"

# environments that have tab delimiters, add more
# as needed
lookForAlignDelims:
    tabbing: 1
You can make sure that your settings are loaded by checking indent.log for details – if you have specified a path that latexindent.pl doesn’t recognise then you’ll get a warning, otherwise you’ll get confirmation that latexindent.pl has read your settings file. 2
Warning
When editing .yaml files it is extremely important to remember how sensitive they are to spaces. I highly recommend copying and pasting from defaultSettings.yaml when you create your first whatevernameyoulike.yaml file.
If latexindent.pl can not read your .yaml file it will tell you so in indent.log.
As of you can specify the paths field from Listing 656 within any of your latexindent.yaml and friends settings files. This can lead to creative nesting of configuration files; a demonstration is given in Section 10.9.
10.8.2. localSettings.yaml and friends
The -l switch tells latexindent.pl to look for localSettings.yaml and/or friends in the same directory as myfile.tex. For example, if you use the following command
latexindent.pl -l myfile.tex
then latexindent.pl will search for and then, assuming they exist, load each of the following files in the following order:
localSettings.yaml
latexindent.yaml
.localSettings.yaml
.latexindent.yaml
These files will be assumed to be in the same directory as myfile.tex, or otherwise in the current working directory. You do not need to have all of the above files, usually just one will be sufficient. In what follows, whenever we refer to localSettings.yaml it is assumed that it can mean any of the four named options listed above.
If you’d prefer to name your localSettings.yaml file something different, (say, mysettings.yaml as in Listing 657) then you can call latexindent.pl using, for example,
latexindent.pl -l=mysettings.yaml myfile.tex
Any settings file(s) specified using the -l switch will be read after defaultSettings.yaml and, assuming they exist, any user setting files specified in indentconfig.yaml.
Your settings file can contain any switches that you’d like to change; a sample is shown in Listing 658, and you’ll find plenty of further examples throughout this manual.
#  verbatim environments - environments specified
#  here will not be changed at all!
verbatimEnvironments:
    cmhenvironment: 0
    myenv: 1
You can make sure that your settings file has been loaded by checking indent.log for details; if it can not be read then you receive a warning, otherwise you’ll get confirmation that latexindent.pl has read your settings file.
10.8.3. The -y|yaml switch
You may use the -y switch to load your settings; for example, if you wished to specify the settings from Listing 658 using the -y switch, then you could use the following command:
latexindent.pl -y="verbatimEnvironments:cmhenvironment:0;myenv:1" myfile.tex
Note the use of ; to specify another field within verbatimEnvironments. This is shorthand, and equivalent, to using the following command:
latexindent.pl -y="verbatimEnvironments:cmhenvironment:0,verbatimEnvironments:myenv:1" myfile.tex
You may, of course, specify settings using the -y switch as well as, for example, settings loaded using the -l switch; for example,
latexindent.pl -l=mysettings.yaml -y="verbatimEnvironments:cmhenvironment:0;myenv:1" myfile.tex
Any settings specified using the -y switch will be loaded after any specified using indentconfig.yaml and the -l switch.
If you wish to specify any regex-based settings using the -y switch,
it is important not to use quotes surrounding the regex; for example, with reference to the ‘one sentence per line’ feature (Section 4.2) and the listings within Listing 360, the following settings give the option to have sentences end with a semicolon
latexindent.pl -m --yaml='modifyLineBreaks:oneSentencePerLine:sentencesEndWith:other:\;'
Note that the paths settings (see Section 10.9) can not be specified using the -y switch.
10.8.4. Settings load order
latexindent.pl loads the settings files in the following order:
defaultSettings.yamlis always loaded, and can not be renamed;anyUserSettings.yamland any other arbitrarily-named files specified inindentconfig.yaml;localSettings.yamlbut only if found in the same directory asmyfile.texand called with-lswitch; this file can be renamed, provided that the call tolatexindent.plis adjusted accordingly (see Section 10.8.2). You may specify both relative and absolute paths to other YAML files using the-lswitch, separating multiple files using commas;any settings specified in the
-yswitch.
A visual representation of this is given in Fig. 1.
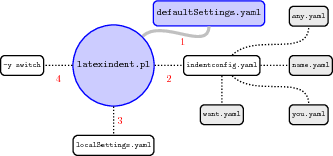
Fig. 1 Schematic of the load order described in Section 10.8.4; solid lines represent mandatory files, dotted lines represent optional files. indentconfig.yaml can contain as many files as you like. The files will be loaded in order; if you specify settings for the same field in more than one file, the most recent takes priority.
10.8.5. indentconfig options
This section describes the possible locations for the main configuration file, discussed in Section 10.8.1. Thank you to (Nehctargl 2022) for this contribution. The possible locations of indentconfig.yaml are read one after the other, and reading stops when a valid file is found in one of the paths.
Before stating the list, we give summarise in Table 5.
environment variable |
type |
Linux |
macOS |
Windows |
|---|---|---|---|---|
LATEXINDENT_CONFIG |
full path to file |
yes |
yes |
yes |
XDG_CONFIG_HOME |
directory path |
yes |
no |
no |
LOCALAPPDATA |
directory path |
no |
no |
yes |
The following list shows the checked options and is sorted by their respective priority. It uses capitalized and with a dollar symbol prefixed names (e.g. $LATEXINDENT_CONFIG) to symbolize environment variables. In addition to that the variable name $homeDir is used to symbolize your home directory.
The value of the environment variable
$LATEXINDENT_CONFIGis treated as highest priority source for the path to the configuration file.The next options are dependent on your operating system:
Linux:
The file at
$XDG_CONFIG_HOME/latexindent/indentconfig.yamlThe file at
$homeDir/.config/latexindent/indentconfig.yaml
Windows:
The file at
$LOCALAPPDATA\latexindent\indentconfig.yamlThe file at
$homeDir\AppData\Local\latexindent\indentconfig.yaml
Mac:
The file at
$homeDir/Library/Preferences/latexindent/indentconfig.yaml
The file at
$homeDir/indentconfig.yamlThe file at
$homeDir/.indentconfig.yaml
10.8.6. Why to change the configuration location
This is mostly a question about what you prefer, some like to put all their configuration files in their home directory (see $homeDir above), whilst some like to sort their configuration. And if you don’t care about it, you can just continue using the same defaults.
10.8.7. How to change the configuration location
This depends on your preferred location, if, for example, you would like to set a custom location, you would have to change the $LATEXINDENT_CONFIG environment variable.
Although the following example only covers $LATEXINDENT_CONFIG, the same process can be applied to $XDG_CONFIG_HOME or $LOCALAPPDATA because both are environment variables. You just have to change the path to your chosen configuration directory (e.g. $homeDir/.config or $homeDir\AppData\Local on Linux or Windows respectively)
10.8.8. Linux
To change $LATEXINDENT_CONFIG on Linux you can run the following command in a terminal after changing the path:
echo 'export LATEXINDENT_CONFIG="/home/cmh/latexindent-config.yaml"' >> ~/.profile
Context: This command adds the given line to your .profile file (which is commonly stored in $HOME/.profile). All commands in this file a run after login, so the environment variable will be set after your next login.
You can check the value of $LATEXINDENT_CONFIG by typing
echo $LATEXINDENT_CONFIG
/home/cmh/latexindent-config.yaml
Linux users interested in $XDG_CONFIG_HOME can explore variations of the following commands
echo $XDG_CONFIG_HOME
echo ${XDG_CONFIG_HOME:=$HOME/.config}
echo $XDG_CONFIG_HOME
mkdir /home/cmh/.config/latexindent
touch /home/cmh/.config/latexindent/indentconfig.yaml
10.8.9. Windows
To change $LATEXINDENT_CONFIG on Windows you can run the following command in powershell.exe after changing the path:
[Environment]::SetEnvironmentVariable
    ("LATEXINDENT_CONFIG", "\your\config\path", "User")
This sets the environment variable for every user session.
10.8.10. Mac
To change $LATEXINDENT_CONFIG on macOS you can run the following command in a terminal after changing the path:
echo 'export LATEXINDENT_CONFIG="/your/config/path"' >> ~/.profile
Context: This command adds the line to your .profile file (which is commonly stored in $HOME/.profile). All commands in this file a run after login, so the environment variable will be set after your next login.
10.9. paths demonstration
As detailed in Section 10.8 , the paths field can be specified in any of your YAML files.
We will use the file in Listing 659 for demonstration in what follows.
\pathdemo[
opt arg
]{
mand arg
}
Consider the settings given in Listing 660 and Listing 661.
defaultIndent: ''
paths:
- path2.yaml
defaultIndent: ' '
Upon calling
latexindent.pl -l=path1.yaml paths-demo.tex
then we will receive the output given in Listing 662.
\pathdemo[
   opt arg
]{
   mand arg
}
We note that the settings from Listing 661 have been called from Listing 660.
On inspection of indent.log from the above call, we see the details of this part of the process given in Listing 663.
YAML settings, reading from the following files:
       Reading USER settings from path1.yaml
       Reading path information from path1.yaml
       ---
       defaultIndent: ''
       paths:
         - path2.yaml

       ---
       defaultIndent: ''
       paths:
         - path2.yaml

       Reading USER settings from path2.yaml
       ---
       defaultIndent: '   '
Consider the settings given in Listing 664 to Listing 666.
defaultIndent: ''
paths:
- path4.yaml
defaultIndent: '   '
paths:
- path5.yaml
defaultIndent: ' '
Upon calling
latexindent.pl -l=path3.yaml paths-demo.tex
then we will receive the output given in Listing 667.
\pathdemo[
 opt arg
]{
 mand arg
}
We see that path3.yaml calls path4.yaml which in turn calls path5.yaml.
On inspection of indent.log from the above call, we see the details of this part of the process given in Listing 668.
YAML settings, reading from the following files:
       Reading USER settings from path3.yaml
       Reading path information from path3.yaml
       ---
       defaultIndent: ''
       paths:
         - path4.yaml

       ---
       defaultIndent: ''
       paths:
         - path4.yaml

       Reading USER settings from path4.yaml
       Reading path information from path4.yaml
       ---
       defaultIndent: '   '
       paths:
         - path5.yaml

       ---
       defaultIndent: '   '
       paths:
         - path5.yaml

       Reading USER settings from path5.yaml
       ---
       defaultIndent: ' '
10.10. logFilePreferences
latexindent.pl writes information to indent.log, some of which can be customized by changing logFilePreferences; see Listing 669. If you load your own user settings (see Section 10.8.1) then latexindent.pl will detail them in indent.log; you can choose not to have the details logged by switching showEveryYamlRead to 0. Once all of your settings have been loaded, you can see the amalgamated settings in the log file by switching
showAmalgamatedSettings to 1, if you wish.
520logFilePreferences:
521  showEveryYamlRead: 1
522  showAmalgamatedSettings: 0
523  endLogFileWith: '--------------'
524  showGitHubInfoFooter: 1
525  Dumper:
526    Terse: 1
527    Indent: 1
528    Useqq: 1
529    Deparse: 1
530    Quotekeys: 0
531    Sortkeys: 1
532    Pair: " => "
The log file will end with the characters given in endLogFileWith, and will report the GitHub address of latexindent.pl to the log file if showGitHubInfoFooter is set to 1.
Note: latexindent.pl no longer uses the log4perl module to handle the creation of the logfile.
Some of the options for Perl’s Dumper module can be specified in Listing 669; see (“Data::Dumper Module” n.d.) and (“Data Dumper Demonstration” n.d.) for more information. These options will mostly be helpful for those calling latexindent.pl with the -tt option described in Section 2.1.
Listing 669 describes the options for customising the information given to the log file, and we provide a few demonstrations here.
10.11. Encoding
When using latexindent in different ways on different systems, the range of characters supported by its switches/flags/options (see Section 2.1) may vary.
For the Windows executable file latexindent.exe, its options support UTF-8 characters.
For the Windows Perl script latexindent.pl, its option switch supports the characters supported by the encoding corresponding to the system code page. You can check the system code page by running the following command in either cmd.exe or powershell.exe:
chcp
which may receive the following result
Active code page: 936
- and then the characters supported by the code page can be found in `https://learn.microsoft.com/en-us/windows/win32/intl/code-page-identifiers <Microsoft’s
code page identifier table>`__. For example, the characters supported by the encoding corresponding to code page 936 are: ANSI/OEM Simplified Chinese (PRC, Singapore); Chinese Simplified (GB2312).
For Ubuntu Linux and macOS users, whether using the Perl script or the executable file, the options support UTF-8 characters.
10.12. dos2unix linebreak adjustment
- dos2unixlinebreaks:integer
If you use latexindent.pl on a dos-based Windows file on Linux then you may find that trailing horizontal space is not removed as you hope.
In such a case, you may wish to try setting dos2unixlinebreaks to 1 and employing, for example, the following command.
latexindent.pl -y="dos2unixlinebreaks:1" myfile.tex
See (“Windows Line Breaks on Linux Prevent Removal of White Space from End of Line” n.d.) for further dertails.
10.13. Thanks
I first created latexindent.pl to help me format chapter files in a big project. After I blogged about it on the TeX stack exchange (“A Perl Script for Indenting Tex Files” n.d.) I received some positive feedback and follow-up feature requests. A big thank you to Harish Kumar (Kumar 2013) who helped to develop and test the initial versions of the script.
The YAML-based interface of latexindent.pl was inspired by the wonderful arara tool; any similarities are deliberate, and I hope that it is perceived as the compliment that it is. Thank you to Paulo Cereda and the team for releasing this awesome tool; I initially worried that I was going to have to make a GUI for latexindent.pl, but the release of arara has meant there is no need.
There have been several contributors to the project so far (and hopefully more in the future!); thank you very much to the people detailed in Section 9 for their valued contributions, and thank you to those who report bugs and request features at (“Home of Latexindent.pl” n.d.).
“Anacoda.” n.d. Accessed December 22, 2021. https://www.anaconda.com/products/individual.
“A Perl Script for Indenting Tex Files.” n.d. Accessed January 23, 2017. http://tex.blogoverflow.com/2012/08/a-perl-script-for-indenting-tex-files/.
“Conda Forge.” n.d. Accessed December 22, 2021. https://github.com/conda-forge/miniforge.
“CPAN: Comprehensive Perl Archive Network.” n.d. Accessed January 23, 2017. http://www.cpan.org/.
“Data Dumper Demonstration.” n.d. Accessed June 18, 2021. https://stackoverflow.com/questions/7466825/how-do-you-sort-the-output-of-datadumper.
“Data::Dumper Module.” n.d. Accessed June 18, 2021. https://perldoc.perl.org/Data::Dumper.
eggplants. 2022. “Add Dockerfile and Its Updater/Releaser.” June 12, 2022. https://github.com/cmhughes/latexindent.pl/pull/370.
Geus, Tom de. 2022. “Adding Perl Installation + Pre-Commit Hook.” January 21, 2022. https://github.com/cmhughes/latexindent.pl/pull/322.
Holthuis, Jan. 2022. “Fix Pre-Commit Usage.” March 31, 2022. https://github.com/cmhughes/latexindent.pl/pull/354.
“Home of Latexindent.pl.” n.d. Accessed January 23, 2017. https://github.com/cmhughes/latexindent.pl.
“How to Create Your Own Auto-Completion for Json and Yaml Files on Vs Code with the Help of Json Schema.” n.d. Accessed January 1, 2022. https://dev.to/brpaz/how-to-create-your-own-auto-completion-for-json-and-yaml-files-on-vs-code-with-the-help-of-json-schema-k1i.
“How to Install Anaconda on Ubuntu?” n.d. Accessed January 21, 2022. https://askubuntu.com/questions/505919/how-to-install-anaconda-on-ubuntu.
J., Randolf. 2020. “Alpine-Linux Instructions.” August 10, 2020. https://github.com/cmhughes/latexindent.pl/pull/214.
Juang, Jason. 2015. “Add in Path Installation.” November 24, 2015. https://github.com/cmhughes/latexindent.pl/pull/38.
Kumar, Harish. 2013. “Early Version Testing.” November 10, 2013. https://github.com/harishkumarholla.
“Latexindent.pl Ghcr (Github Container Repository) Location.” n.d. Accessed June 12, 2022. https://github.com/cmhughes?tab=packages.
Nehctargl. 2022. “Added Support for the Xdg Specification.” December 23, 2022. https://github.com/cmhughes/latexindent.pl/pull/397.
“Perlbrew.” n.d. Accessed January 23, 2017. http://perlbrew.pl/.
“Pre-Commit: A Framework for Managing and Maintaining Multi-Language Pre-Commit Hooks.” n.d. Accessed January 8, 2022. https://pre-commit.com/.
“Solving Environment: Failed with Initial Frozen Solve. Retrying with Flexible Solve.” n.d. Accessed January 21, 2022. https://github.com/conda/conda/issues/9367#issuecomment-558863143.
“VSCode Yaml Extension.” n.d. Accessed January 1, 2022. https://marketplace.visualstudio.com/items?itemName%20=%20redhat.vscode-yaml.
“Windows Line Breaks on Linux Prevent Removal of White Space from End of Line.” n.d. Accessed June 18, 2021. https://github.com/cmhughes/latexindent.pl/issues/256.